When beginners start tennis, most focus on learning forehands, backhands, serves, and volleys. While stroke technique is important, experienced coaches across the United States California agree on one fundamental truth:
Your feet determine the quality of your shots.
The difference between a beginner and an advanced player is often not the racket swing but how efficiently they move around the court this called foot print on the right trucking. Great footwork allows players to reach the ball early, stay balanced, recover quickly, and consistently strike clean shots under pressure. Making them target at thr right spot and moment of timing.
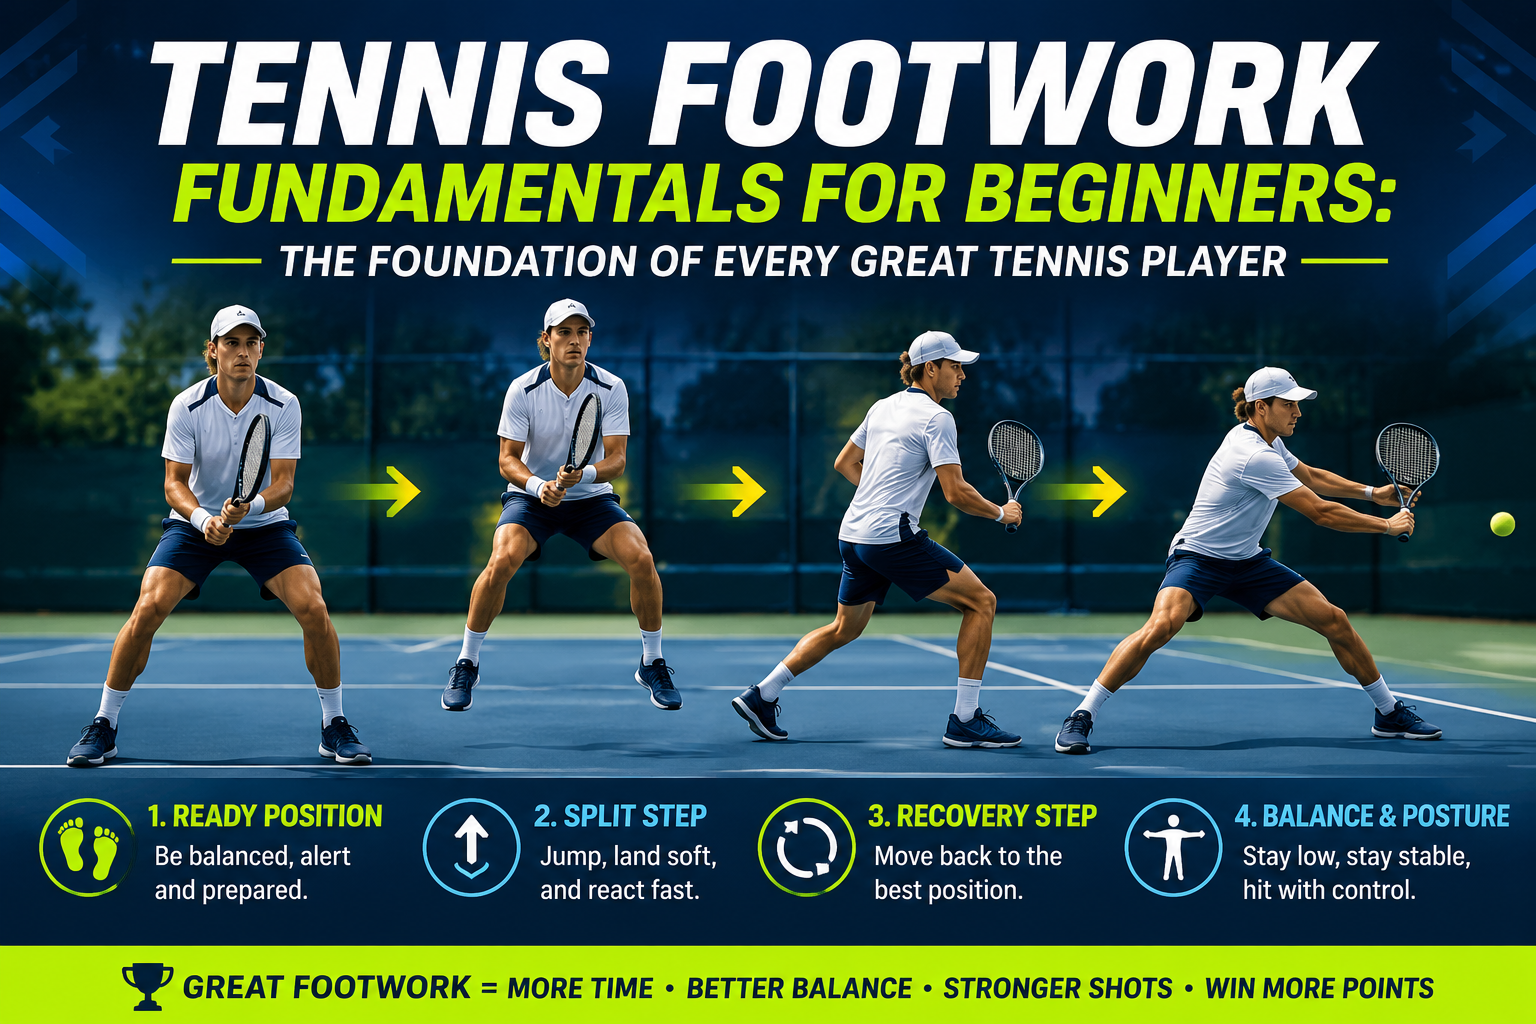
Watch top professionals such as Novak Djokovic, Carlos Alcaraz, and Coco Gauff. Their movement appears effortless because they have mastered the four essential foundations of tennis footwork:
- Ready Position making enought spacing
- Split Step adjustment of the foot works
- Recovery Step defense mode with right balance
- Balance and Posture coorindation making them best position
Before learning advanced movement patterns, every beginner should build these fundamentals first.
Why Footwork Matters More Than Most Beginners Realize
Many new players believe tennis is mainly about racket skills. However, coaches often estimate that movement accounts for a large portion of successful shot execution.
Good footwork helps players:
- Reach balls earlier
- Maintain balance during strokes
- Recover quickly after hitting
- Reduce unforced errors
- Improve court coverage
- Generate more power
- Prevent injuries
Poor footwork causes:
- Late contact points
- Off-balance swings
- Weak shots
- Fatigue
- Slower reactions
- Increased injury risk
A player with average strokes and excellent footwork will often defeat a player with beautiful strokes but poor movement.
Understanding Tennis Movement
Tennis is different from many sports because movement occurs in every direction.
Players must move:
- Forward
- Backward
- Sideways
- Diagonally
- Explosively
- Repeatedly
A single point may require:
- Sprinting
- Stopping
- Changing direction
- Accelerating again
- Recovering to center
This constant movement begins with the ready position.
1. Ready Position: The Starting Point of Every Movement
What Is the Ready Position?
The ready position is the athletic stance a player assumes while waiting for the opponent to hit the ball.
Every movement on a tennis court starts from this position.
Think of it as a sprinter preparing in the starting blocks.
Without a proper ready position, reaction time immediately becomes slower.
Key Elements of the Ready Position
Feet Shoulder Width Apart
The feet should be slightly wider than shoulder width.
This creates:
- Stability
- Balance
- Quick movement capability
Feet positioned too close together reduce mobility.
Feet positioned too wide slow movement initiation.
Knees Slightly Bent
Beginners often stand upright.
This creates a delayed reaction.
Instead:
- Bend the knees slightly.
- Lower the center of gravity.
- Prepare the muscles for explosive movement.
This athletic posture allows faster starts.
Weight on the Balls of the Feet
Avoid standing flat-footed.
Instead:
- Keep weight forward.
- Stay on the balls of the feet.
- Maintain light contact with the court.
Players should feel ready to move instantly in any direction.
Racket Positioned in Front
The racket should stay in front of the body.
Benefits include:
- Faster preparation
- Better reaction time
- Improved control
Many beginners let the racket drop by their side, which delays preparation.
Eyes Focused on Opponent
Always watch the opponent's body language.
Observe:
- Shoulder rotation
- Swing path
- Court positioning
These clues help predict shot direction.
Common Ready Position Mistakes
Standing Too Tall
An upright stance limits explosive movement.
Flat Feet
Flat-footed players react slower.
Racket Too Low
Recovery becomes slower after the opponent's shot.
Weight Leaning Back
This delays movement initiation.
Beginner Ready Position Drill
Shadow Ready Position
- Stand on the baseline.
- Assume ready position.
- Coach calls directions:
- Left
- Right
- Forward
- Backward
- Move one step and return.
Perform:
- 3 sets
- 30 seconds each
This develops athletic readiness.
2. Split Step: The Secret of Quick Reactions
What Is the Split Step?
The split step is a small hop performed just before the opponent strikes the ball.
Every elite player performs a split step before reacting.
The purpose is simple:
Prepare the body to move explosively in any direction.
Without a split step, movement becomes slower and less efficient.
Why the Split Step Works
The split step activates the muscles.
As the feet land:
- Legs load like springs.
- Balance improves.
- Reaction speed increases.
This creates explosive first-step movement.
Research and coaching experience consistently show that proper timing is more important than jump height.
How to Perform the Split Step
Step 1: Small Hop
Perform a light hop.
Do not jump high.
Think:
"Float slightly above the court."
Step 2: Land Softly
Land on:
- Balls of feet
- Slightly bent knees
Stay relaxed.
Step 3: React Immediately
Once the opponent contacts the ball:
- Push off.
- Move toward the incoming shot.
No hesitation.
Timing the Split Step
Timing is critical. Timing again and again requires practice and muscle memory
The landing should occur exactly as the opponent strikes the ball.
If you land:
Too Early
You become stationary.
Too Late
You lose reaction speed.
Professional Example
Watch slow-motion footage of:
- Novak Djokovic
- Jannik Sinner
- Iga Swiatek
You'll notice they split step before nearly every shot.
This is one of the most important habits beginners can learn.
Split Step Drill
Coach Toss Drill
- Stand in ready position.
- Perform split step.
- Coach points left or right.
- Move immediately.
Perform:
- 20 repetitions
- 3 rounds
Focus on timing rather than speed.
3. Recovery Step: Returning to the Best Court Position
What Is the Recovery Step?
After hitting a shot, players must return to an effective court position.
This movement is called the recovery step.
Many beginners admire their shot and forget to recover.
As a result:
- They become out of position.
- The next ball becomes difficult.
Why Recovery Is Essential
Tennis points rarely end after one shot.
Players must prepare for:
- The next ball
- The next direction change
- The next rally phase
Recovery keeps players ready.
Understanding Court Positioning
The ideal recovery position depends on:
Opponent Position
Where is the opponent standing?
Shot Direction
Where did your ball land?
Court Geometry
Which angles are available?
Recovery is not always the exact center mark.
Instead, players recover to the most strategic location.
Basic Recovery Process
Hit
Execute the shot.
Push Off
Use the outside leg.
Shuffle Back
Move efficiently.
Reestablish Ready Position
Prepare for the next shot.
Common Recovery Mistakes
Watching the Shot
Beginners often admire good shots.
Meanwhile, the opponent is preparing the next attack.
Crossing Feet Excessively
Crossing over can create balance problems.
Standing Still
Every shot requires recovery.
Recovery Step Drill
Feed and Recover
- Coach feeds ball.
- Player hits crosscourt.
- Recover immediately.
- Return to ready position.
Repeat:
- 25 balls
- 3 sets
Focus on habit formation.
4. Balance and Posture: The Hidden Key to Consistency
Why Balance Matters
Balance determines:
- Accuracy
- Power
- Consistency
Even perfect technique breaks down if balance is poor.
Professional players maintain remarkable body control throughout rallies.
Components of Tennis Balance
Stable Head Position
The head should remain relatively steady during contact.
Excessive movement affects timing.
Strong Core Engagement
The core stabilizes:
- Upper body
- Hips
- Spine
A strong core improves stroke efficiency.
Athletic Knee Bend
Knee flexion allows:
- Shock absorption
- Stability
- Power generation
Controlled Weight Transfer
Weight should flow naturally through the shot.
Avoid falling backward.
Posture During Movement
Proper posture includes:
- Chest up
- Eyes level
- Shoulders relaxed
- Knees bent
Good posture allows smoother movement transitions.
Balance During Forehands
When hitting forehands:
- Plant outside leg.
- Rotate through the shot.
- Finish balanced.
A balanced finish usually indicates efficient mechanics.
Balance During Backhands
Whether one-handed or two-handed:
- Stay centered.
- Avoid leaning excessively.
- Maintain strong lower-body support.
Balance During Volleys
Volleys require:
- Short movements
- Stable posture
- Minimal head movement
Balance becomes especially important at the net.
Balance Drill
Single-Leg Hold
- Stand on one foot.
- Hold tennis racket.
- Maintain position for 30 seconds.
Progress by:
- Closing eyes
- Catching a ball
- Performing mini swings
This develops court stability.
Combining the Four Fundamentals
The four elements work together continuously during every point.
A typical sequence looks like this:
Ready Position
Prepare for the opponent's shot.
Split Step
Activate movement.
Move to Ball
Reach the contact point.
Hit with Balance
Execute the stroke.
Recovery Step
Return to optimal court position.
Ready Position Again
Prepare for the next shot.
This cycle repeats throughout every rally.
Beginner Footwork Training Routine
Warm-Up (5 Minutes)
- Jogging
- Side shuffles
- High knees
- Butt kicks
Ready Position Drill (5 Minutes)
- Directional movement
- Quick reaction exercises
Split Step Drill (10 Minutes)
- Coach callouts
- Ball toss reactions
Recovery Drill (10 Minutes)
- Feed-hit-recover sequence
Balance Training (10 Minutes)
- Single-leg holds
- Shadow swings
- Controlled movement patterns
Cool Down (5 Minutes)
- Walking
- Stretching
- Mobility exercises
Total training time:
45 minutes
Perfect for beginner development.
Common Beginner Footwork Errors
Error 1: Moving After the Ball Bounces
Good players react before the bounce.
Error 2: Standing Flat-Footed
Stay light on your feet.
Error 3: Forgetting the Split Step
This is one of the biggest movement mistakes.
Error 4: Poor Recovery
Every shot requires repositioning.
Error 5: Upright Posture
Stay athletic and slightly crouched.
What U.S. Tennis Coaches Teach First
Across junior academies and tennis development programs throughout the United States, coaches generally emphasize the following progression:
- Athletic ready position
- Split-step timing
- Efficient first step
- Recovery habits
- Balance during contact
- Advanced movement patterns
Players who master these basics often improve faster than players who focus only on stroke mechanics.
Thinks to remember
Tennis footwork is the engine that drives every successful shot. Before developing powerful serves or aggressive groundstrokes, beginners should establish strong movement habits.
The four fundamental building blocks are:
- Ready Position
- Split Step
- Recovery Step
- Balance and Posture
Mastering these skills will help players move more efficiently, hit cleaner shots, recover faster, and build a foundation for long-term improvement.
Every elite player—from Novak Djokovic to Carlos Alcaraz and Coco Gauff—relies on these same fundamentals. The difference is that they have repeated them thousands of times until the movements became automatic.
For beginners, the path is the same: build the foundation first, practice consistently, and let great footwork elevate every other aspect of your game.